GPU Instancing
Jump to heading How Linework renders outlines
ℹ️ Outline Layers
Be sure to read outline layers first.
Linework supports two methods for rendering outlines efficiently.
-
SRP Batcher
- Optimized for many different mesh types with a limited set of distinct outline visuals
- Requires a separate rendering layer for each distinct outline visual
-
GPU Instancing
- Optimized for a limited set of mesh types with many distinct outline visuals
- Allows a single rendering layer to be used for multiple outline visuals by overriding outline properties per instance
This page explains the differences between the two approaches, when to use each, and how to enable and configure GPU instancing.
Jump to heading SRP Batcher vs GPU Instancing
SRP Batcher
The SRP batcher optimizes rendering by batching together GameObjects that share the same shader. In Linework, outlines can be batched together if they:
- are of the same outline type
- have the same visual settings
The SRP batcher is a good option in the case where you have many different types of meshes, but only a limited set of distinct outline visuals.
The downside of the SRP batcher is that you need to use a separate rendering layer for each outline.
GPU Instancing
GPU instancing is a method where all meshes of the same type can be batched together, regardless of their outline visuals. Outline properties (e.g., color, alpha cutout texture) can be overridden on a per-instance basis using MaterialPropertyBlocks.
GPU instancing is a good option in the case where you have a limited set of mesh types, but many distinct outline visuals. A single rendering layer can be used to render each of these outlines.
The downside of GPU instancing is that if you have a lot of different mesh types, all those types won't be batched together. Additionally, using MaterialPropertyBlocks involves a bit more setup.
Recommendation
| Scenario | Recommended Method |
|---|---|
| Many different mesh types, few outline visuals | SRP Batcher |
| Few mesh types, many outline visuals | GPU Instancing |
Examples:
SRP Batcher: Rendering diverse environments where you only have a few outline styles.
GPU Instancing: Rendering many characters or items where each one has a unique outline color or style.
Jump to heading How to use GPU instancing?
Enabling GPU instancing
By default, outlines in Linework will use the SRP batcher. To enable GPU instancing, simply enable the toggle on your outline.
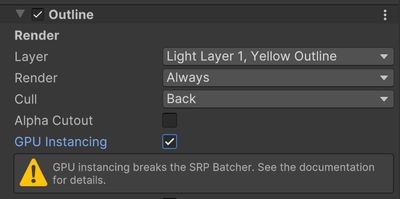
Overriding outline properties
To override the outline visuals of a specific gameobject, add the Outline Override component and set the shader property that you want to override. In the example below, the outline color is overriden.
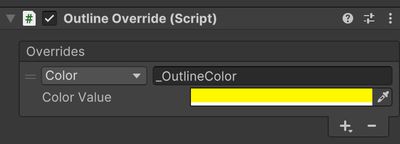

Using this setup, you can render a lot of meshes (of the same type) in a single batch, but with different outline visuals.
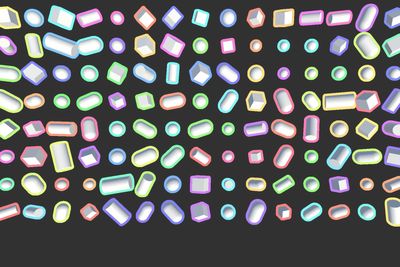
Jump to heading GPU instancing for fills
The surface fill effect works differently than the outlines. Instead of rendering multiple objects, it works by doing a single full-screen, screen-space blit.
If you are in the need of many different fill visuals (more than 8), then a GPU instancing approach can still be taken but for this, Linework is not needed. Below I will shortly explain how this can be done.
- Add a Render Objects pass to your renderer feature, set the queue + layer mask for your desired objects. Set the Override Mode to Material and assign a newly created material that uses a newly created fill shader. On this material, also enable GPU Instancing.
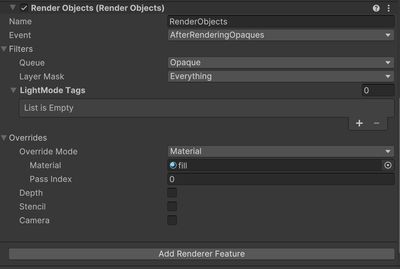
- For the fill shader, you can use the following shader which supports GPU instancing.
Shader "Custom/PatternShader"
{
    Properties
    {
        _Color ("Color", Color) = (1,1,1,1)
        _Scale ("Scale", Float) = 10.0
        _Pattern ("Pattern", Range(0,3)) = 0
    }
    SubShader
    {
        Tags
        {
            "RenderType" = "Transparent"
            "RenderPipeline" = "UniversalPipeline"
        }

        Blend SrcAlpha OneMinusSrcAlpha

        Pass
        {
            HLSLPROGRAM
            #pragma vertex vert
            #pragma fragment frag

            #pragma multi_compile_instancing

            #include "Packages/com.unity.render-pipelines.universal/ShaderLibrary/Core.hlsl"

            UNITY_INSTANCING_BUFFER_START(InstancedProperties)
                UNITY_DEFINE_INSTANCED_PROP(float4, _Color)
                UNITY_DEFINE_INSTANCED_PROP(float, _Scale)
                UNITY_DEFINE_INSTANCED_PROP(int, _Pattern)
            UNITY_INSTANCING_BUFFER_END(InstancedProperties)

            struct Attributes
            {
                float3 positionOS : POSITION;
                UNITY_VERTEX_INPUT_INSTANCE_ID
            };

            struct Varyings
            {
                float4 positionHCS : SV_POSITION;
                UNITY_VERTEX_INPUT_INSTANCE_ID
            };

            Varyings vert(Attributes IN)
            {
                Varyings OUT;
                UNITY_SETUP_INSTANCE_ID(IN);
                UNITY_TRANSFER_INSTANCE_ID(IN, OUT);
                OUT.positionHCS = TransformObjectToHClip(IN.positionOS);
                return OUT;
            }

            float checker(float2 uv)
            {
                return fmod(floor(uv.x) + floor(uv.y), 2.0);
            }

            float dots(float2 uv)
            {
                float2 f = frac(uv) - 0.5;
                return step(0.25, length(f));
            }

            float stripes(float2 uv)
            {
                return fmod(floor(uv.x), 2.0);
            }

            half4 frag(Varyings IN) : SV_Target
            {
                UNITY_SETUP_INSTANCE_ID(IN);

                float2 uv = GetNormalizedScreenSpaceUV(IN.positionHCS.xy) * UNITY_ACCESS_INSTANCED_PROP(InstancedProperties, _Scale);

                float patternIndex = UNITY_ACCESS_INSTANCED_PROP(InstancedProperties, _Pattern);
                float pattern;

                if (patternIndex == 0)
                    pattern = dots(uv);
                else if (patternIndex == 1)
                    pattern = checker(uv);
                else
                    pattern = stripes(uv);

                return lerp(UNITY_ACCESS_INSTANCED_PROP(InstancedProperties, _Color), float4(0, 0, 0, 0), pattern);
            }

            ENDHLSL
        }
    }
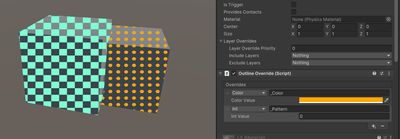
}- To override properties, you can use the Outline Override script that comes with Linework which basically allows you to set the MaterialPropertyBlock values which can be used to give each renderer different visuals. In the screenshot here, the color and pattern is changed. Since (afaik) MaterialPropertyBlocks do not allow shader keywords to be set, I used an Int property to switch between patterns.
-
As a double check, open Window > Analysis > Frame Debugger and check if you indeed see that the fills are rendered in an instanced batch.
